So, University returns next week and I have yet to finish my challenge. I'm going to continue until I complete each cupcake but it will be much a slower process. I will make it to the end!
I'm very much looking forward to making the Zombie Breakfast cupcakes, which may happen next weekend! :D
Thanks for sticking around x
Monday, February 21, 2011
Cupcake 12 - Black Roses

Cupcake Name:
Black Roses
And this is how it went down:
Okay. So, I was really nervous making these. Roses are to cake decorating like... well, I can’t actually think of something to compare it with, but let’s just say it’s freakin’ hard and like a major deal in cake decorating. As with the Marzipan Beetles, I didn’t colour the marzipan before. I think, if I were making pink roses, I would but the black is hard to do. Anyway, the cupcakes and the frosting are both vanilla.
Ah. My first attempt was an utter failure. Like a total embarrassment. I didn’t even read the instructions; I just made it up... so it serves me right!

After I read the instructions and followed them properly, I created something that actually looked rose-like! Woah, I know. I’m actually pretty proud of my first real marzipan rose. It was supposed to be made from gum paste but... you know my woes-me story about being a poor student and using what I have so I won’t trouble ya’ll again.

Anywho, I painted it black with my food colouring and then placed it on top of the cupcake!

Wins:
• The second rose is pretty good!
Fails:
• The first rose.
• The painted food colouring – made the rose look a tad too shiny
What I’d do different if I had my time over:
• Use gum paste and food colouring before it is made – not after!

Cupcake 11 - Marzipan Beetles

Cupcake Name:
Marzipan Beetles.
And this is how it went down:
These are like uber simple. I don’t even know how I’m going to make a blog out of this – it is that simple. The cupcake and the frosting are both vanilla but you can use any kind of this recipe!
I didn’t kneed my black food colouring into my marzipan. To get it to the right colour, I need to use a LOT of colouring which makes the marzipan go too gloopy... which ain’t cool. So, I made my beetles up and then painted them. They were pretty easy to make – I just moulded a small piece of marzipan into the shape of a beetle, using a toothpick, I marked out the lines on its body and voila! Beetle.

From here, I painted the beetles with black colouring and then dusted them with an avocado coloured lustre dust – they kinda look like Christmas Beetles! When they dried, I just popped them on the top the cupcakes. See what I mean? Simple! But very creepy cool.


Wins:
• I’m really happy with the beetles!
Fails:
• Nothing.
What I’d do different if I had my time over:
• Nothing, really. I’d maybe play around with the beetle shape a little more but that is probably about it!

Sunday, January 30, 2011
Cupcake 10 - Eerie Eyeballs.

Cupcake Name:
Eerie Eyeballs
And this is how it went down:
Both the cake and the frosting is vanilla. Unfortunately, I couldn’t find any powered white food colouring to make the frosting a better colour but I think it worked out alright.
Confession time... I didn’t follow the recipe for this one at all. Because I’m only making one or two cupcakes of each kind at a time, it didn’t seem practical or economical for me to make the eyeballs the way Lily made them, though would like to make them one day in the future. She makes them out of gelatine and coconut milk but I made mine from white icing. I just rolled them into spheres and then using blue and black food dye, I painted on the irises.


The worms are made from marzipan and copper food dye. I just formed them into worm shapes and created a bit of texture on them using a knife.

The rest was pretty simple, just placing the eyeballs and worms around the cake!

Wins:
• The eyeballs and worms look pretty great.
• The cake is numcity.
Fails:
• Not much. They’re pretty cool!
What I’d do different if I had my time over:
• I’d really like to try to make the eyeballs using gelatine and coconut milk. They look great and I bet the texture is more eyeball-esque.

Cupcake 9 - Crazy Crabs

Cupcake Name:
Crazy Crabs
And this is how it went down:
This is my most favourite one yet! They’re so so so cute! And not all that difficult to create! The cake is Red Velvet Cake and there is also a tiny bit of vanilla frosting used on this cake. It is mostly made with marzipan.

Taking a small piece, I kneaded a few drops of red food colouring into the marzipan until the colour was completely even. I then covered my board in icing sugar and rolled out a thin layer of the red marzipan. Using a knife, I cut a crab like shell out of the marzipan and then rolled the rest up into 2 balls and shaped them into claws.
I put a spoonful of frosting onto the cake and then laid the crab shell over the top. I lifted the sides of the shell and tucked the claws underneath. Then, using my icing pens, I placed to dots of white and black onto the cake for eyes. Finally, to make the shell and the claws nice and shiny, I painted them with a mix of vanilla extract and salmon coloured lustre dust.


Wins:
• Pretty much everything. These cakes look the closest to Lily’s so far...
Fails:
• Nothing. Love them!
What I’d do different if I had my time over:
• Nothing. I think they’re perfection!

Sunday, January 23, 2011
Cupcake 8 - Mutant Ears

Cupcake Name:
Mutant Ears
And this is how it went down:
This one was really easy to make. Like, super easy. The cake is Red Velvet Cake and the frosting is of the deliciously evil vanilla kind.

So, I thought a normal ear is kinda boring even for a cupcake. As I am a complete geek and love Star Trek, I decided to make a Vulcan ear. On a clean, icing sugar covered surface, I kneaded ivory food colouring into a small piece of marzipan until it was completely mixed in. From here, I shaped it into a Vulcan shaped ear using my hands and the other end of my paint brush.

When the ear was finished being molded, I placed it on top of the frosted cupcake.

Wins:
• Vulcan ears. Geeky deliciousness.
• Cake = Numcity.
• Frosting = Also numcity
Fails:
• None, apart from icky tasting marzipan!
What I’d do different if I had my time over:
• Nothing. I don’t think I could actually do any more with this one.

Cupcake 7 - Sweeney Todd's Surprise

Cupcake Name:
Sweeney Todd’s Surprise
And this is how it went down:
The cupcake is Lily’s red velvet cake which is absolutely delicious and is one of my new favourite flavours. The colour is so amazing. This batch is again only made with 3 table spoons of red food colouring but I still think it looks brilliant.

This cake is made using marzipan. Now marzipan is awesome. It is great for creating shapes and and array of different 3D objects but it tastes horrible! That aside, this cake is awesome. I love Sweeney Todd so I had a lot of fun with this one.
Firstly, I rolled out a large circle of marzipan to act as the top of the pie. I added a large spoonful of vanilla frosting to the tip of the cake and then draped the marzipan over it. Then, I rolled the edges over to create a ‘crust’ around the ‘pie’ and using a knife, I created indents around the crust.

Using ivory food colouring and a paint brush, I painted the ‘pie crust’ to give it a well baked look. I then dusted the top with copper luster dust. With a sharp knife, I cut a small but deep triangular hole in the centre of the ‘pie’.

Using two small balls of marzipan, I rolled out two finger-like shapes and then created the look of a real finger by drawing fingernails and knuckle creases in with a toothpick. Then with a paintbrush, I pained the fingernails with pink food die.
To finish the cake off, I inserted the marzipan finger into the pie (Hahaha, yes, have a good chuckle as this sentence!) and using the cherry sauce that has been used in previous cakes, I dripped it down the pie and put a little amount on the end of the second finger to lay next to the pie cake.

Wins:
• Marzipan is brilliant. I was going to use white icing again but I decided to try marzipan and I’m very impressed with it even though it tastes disgusting!
• Ivory colouring makes a convincing pie colour, especially mixed with the luster dust.
• The fingers look cool!
Fails:
• None!
What I’d do different if I had my time over:
• Work a tiny bit more with the crust!

Tuesday, January 18, 2011
Cupcake 6 - Shattered Glass

Cupcake Name:
Shattered Glass
And this is how it went down:
This was one of the ones I was most excited about making. It seemed very technical but it was actually quite simple to create. I used the last of the chocolate cupcake batch to create this morbid sweet treat.
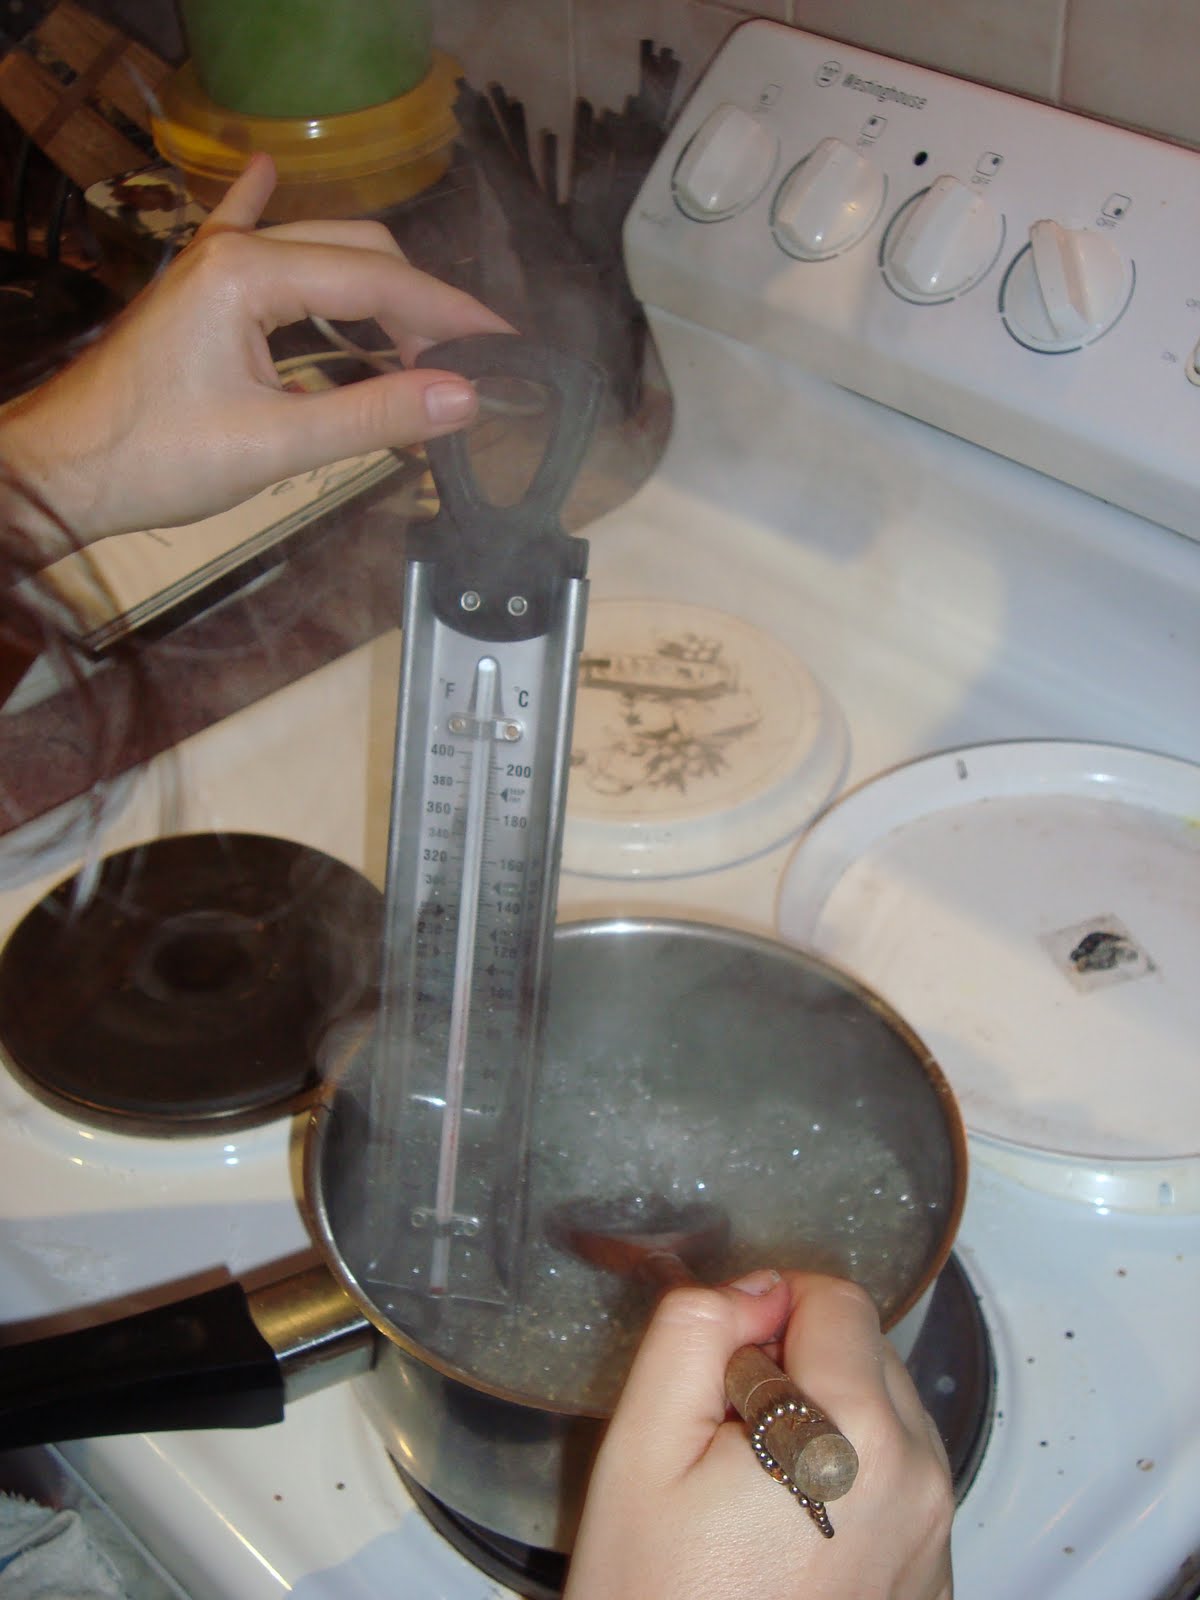
So, according to Lily, Sugar Glass is what they use in the movies instead of real glass. It’s safer and smashes in almost the same way – which is good for the actors and the movie go-er, no loss of action or actors. It is also pretty tasty. To make it, I mixed sugar, water, glucose syrup and cream of tartar in a saucepan until it boiled... That isn’t all though... you have to concentrate kinda hard for the next part. You need a candy thermometer – see, technical – and you must leave it in the saucepan AND stir at the same time AS WELL AS keeping your eye on the temperature. At first, I didn’t think it was working. To make hard snap candy, you have to get the mixture to reach 150 degrees C (which I think is maybe 300ish degrees F) and for a long while (okay, it was like 5 minutes) it was sitting at about 110C. But then, it started bubbling and boiling up like what I imagine lava would look like but obviously not red and a hell of a lot cooler. The temperature rose fairly quickly and got to 150C in about 15 minutes.
From here, I quickly poured the sugar mixture into a aluminium foil lined tray that had been greased with canola oil. Then, I waited...

After about an hour, the candy had become rock hard and had cooled completely. This was where the fun part began – smashing it with a meat tenderiser! And, it totally smashes like real glass!

I frosted the cakes with Vanilla frosting – but again the humidity is around 70% tonight so it started to melt as soon as I took it out of the fridge, I think I’m going to make a much thicker mixture to stop this from happening. However, the melty-ness kinda worked for this cake.
I then stuck a few good shards into each cake and then dripped on my cherry sauce mixture that was used on both Dracula’s Bites and Blood-Stained-Brains. Due to the heat, the sauce just slid right off and pooled at the base of the cake and onto the board they were sitting on, which looked really gruesome and cool.


Wins:
• The candy! I’m so excited that I made candy that actually snapped like it was supposed to. I love my candy thermometer a lot!
• Of course, the cake is full of amazement and deliciousness.
• Just the whole look of it. So disgusting and bloody. I love it.\
Fails:
• Frosting, even though this time around the runny effect looked cool.
What I’d do different if I had my time over:
• Made more chocolate cakes to use all the candy shards I have! What am I going to do with a container full of Sugar Glass?!

Monday, January 17, 2011
Cupcake 5 - Day of the Dead Skulls

Cupcake Name:
Day of the Dead Skulls
And this is how it went down:
These cupcakes are the hardest I’ve made so far. They’re made using chocolate cupcakes and they are covered in fondant (well, in this case – white icing). Firstly Using a knife, I cut two ‘eye sockets’ out of the cakes. Then, with the rolled out white icing, I covered the cupcakes. This was the hard part. It was difficult to prevent holes, especially when I was attempting to tuck it into the ‘eye sockets’. It was also hard to make a skull shape out of round cupcakes. I’m not sure how Lily did it but perhaps fondant is easier to mould into that kind of shape than white icing.


I attempted to use home-made coloured frosting to decorate these skulls but it was way too runny and my decorating pen wasn’t holding well, so I had to use the couple of icing pens I had – in glitter black and plain red. I wish I had more colours because I could have made them look so awesome.

I used little sugar hearts, flowers, cachous to decorate the skulls, sticking them down with confectioner’s glue (which is awesome!). I’m not overly happy with them. They look like a 5 year old has made them but I guess that was kinda the look they have anyway.
Wins:
• The cake.
• Confectioner’s glue is brilliant!
• The flowers, sugar hearts and cachous were fun to use to decorate.
• They kinda look like a retarded version of Lily’s.
Fails:
• White icing, why do you fail me?!
• Home-made frosting. Why couldn’t I have more coloured icing pens on hand!?
What I’d do different if I had my time over:
• I might like to do these over again at the end of the challenge. They’re really fun to make but I will attempt to get fondant and more coloured icing pens to make really good ones!

Sunday, January 16, 2011
Cupcake 4 - Rotten Ragworms

Cupcake Name:
Rotten Ragworms
And this is how it went down:
I made a batch of Lily’s chocolate cupcakes and used four for this recipe. Um, wow. These cupcakes are honestly the yummiest things I’ve ever eaten. They’re super moist (there is that word again!) and tasty! I’ve never made chocolate (or any) cupcakes with sour cream before but if it makes them taste like that I’ll be adding it to all my batters!

The frosting is Lily’s delicious Vanilla frosting which is made with double cream. I always used to make my frosting with just butter, icing sugar and a bit of milk, but the cream just takes away that buttery taste (which I really dislike).

So, the worms. They call for chestnut and black food colouring. I couldn’t find any chestnut food colouring and the best I could get was ivory. I added a drop of black and a tsp of cocoa powder to make the white icing (I also didn’t have fondant but had two packets of white icing – I’m a student and have donated my last dollars to the QLD flood relief so, I thought this would do) it as dark as I could, which wasn’t that dark at all!

I used Copper luster dust to paint the worms to give them a shiny appearance and to make them a little darker. Using a fork, I created a bit of texture around the outside so they looked less like snakes! The worms were then placed on top of the frosted cakes.


Wins:
• The cake is perfection.
• Luster dust is amazing. I didn’t think it would look that great. I love it!
• The worms look kinda worm-like?
Fails:
• Colour of the worms.
• Size of the worms.
What I’d do different if I had my time over:
• Find Chesnut colouring and use fondant. Honestly though, I’m not a cake decorator and I think I’m doing a pretty alright job considering the money, time and resources I have!
• I’d make the worms a tiny bit smaller so they didn’t look like more like snakes!

Subscribe to:
Comments (Atom)